

How To Add Splash Screens To Retropie
When a Raspberry Pi boots in Raspberry Pi Bone, nosotros come across a splash screen, an image that tells us that the operating system is loading. But why settle for the default? If nosotros are planning to embed a Raspberry Pi in an art installation, interactive advertisement or information lath, and so a custom splash screen is a cool and simple way to add a little form to your project. Or you could just change the image to charm yourself and your friends. Replacing the Raspberry Pi splash screen is exceptionally like shooting fish in a barrel.
We don't need to install any extra software on our Raspberry Pi, and the software to create the images and videos is bachelor gratuitous of charge on the Internet. In this tutorial we shall create two custom splash assets: a kicking splash image and then a video which plays while our Raspberry Pi boots. The inspiration for this tutorial comes from the RetroPie retro emulator which has custom kicking splashes as part of its theme manager.
How to Replace the Raspberry Pi Splash Screen Image

1. In your favorite paradigm editor create a splash screen and save it every bit splash.png . We chose a 1920 10 1080 resolution as it scales well with 16:9 resolutions.
2. Re-create the epitome to a USB flash bulldoze and insert the drive into the Raspberry Pi.
iii. Copy splash.png from the USB flash drive to your habitation directory /home/pi/
four. Open up a Final and change directory to the location of the original splash screen for your Pi.
$ cd /usr/share/plymouth/themes/pix/ v. Backup the original splash.png file to a file called splash.png.bk.
$ sudo mv splash.png splash.png.bk half dozen. Copy your splash.png to the electric current directory. This will copy the freshly created splash image gear up for use.
$ sudo cp /home/pi/splash.png ./ 7. Reboot your Raspberry Pi.
Once your Raspberry Pi reboots you will meet the familiar rainbow screen, and so a few seconds later you will see your custom splash screen.
How to Create a Raspberry Pi Splash Screen Video
A picture is worth a thousand words and it can really sell your projection, so a video must exist an society of magnitude more effective. The process to add together a video is also just ii lines of lawmaking, and a video file. For all-time results why not take a kick splash image and a video, by doing this we keep all of the console logs hidden from prying eyes, and information technology keeps our boot process on brand.
1. Create a video using a video editor. We chose to use DaVinci Resolve because it is free and exceptionally powerful but any editor is fine. Your video should be 1920 10 1080 and exist output as an mov file using the H264 codec.
2. Copy the file to a USB flash drive, we called the file Thursday-intro.mov.
3. Insert the USB flash drive into your Raspberry Pi and re-create your video to the home directory /habitation/pi/
4. Open a Concluding and open the rc.local file for editing.
$ sudo nano /etc/rc.local 5. Scroll to the line before exit 0 and enter ii lines of code. The start is a annotate, to explain what we are doing, the second uses the command line video histrion omxplayer to play the video in the dwelling directory. The added & is an pedagogy to run the control in the background. Call back to change Thursday-intro.mov to match the proper name of your video.
#Run video on boot omxplayer /habitation/pi/Th-intro.mov & 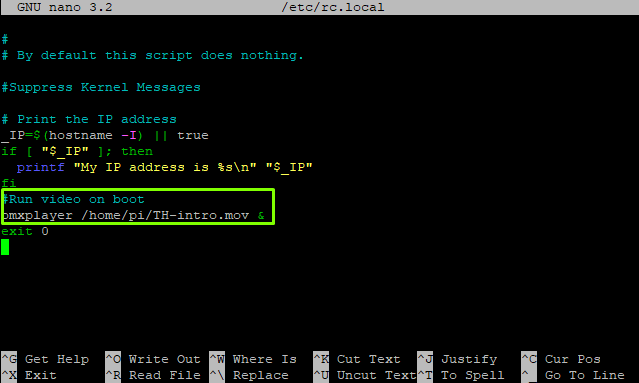
half-dozen. Press CTRL + Ten, then press Y and ENTER to salve and go out the editor.
seven. Reboot the Raspberry Pi.
The Raspberry Pi volition reboot and nosotros will see the boot process happen, our custom splash screen volition appear and and then, subsequently a few seconds, the video will play while the system finishes the boot process.

How To Add Splash Screens To Retropie,
Source: https://www.tomshardware.com/how-to/custom-raspberry-pi-splash-screen
Posted by: joneskinesen.blogspot.com
0 Response to "How To Add Splash Screens To Retropie"
Post a Comment